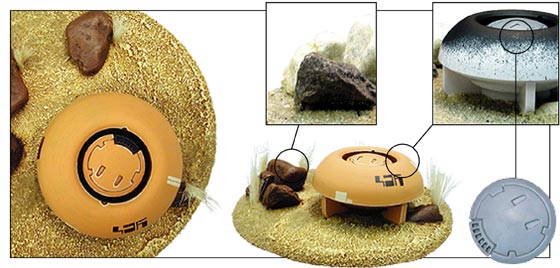
# of Items: 0
Total: $.00
- CHECKOUT -

Getting Started with Warhammer 40,000
Warhammer 40,000 Miniatures Catalog

Gaming
- The Amber Prison of Tikgrix
- Choose Your Own 40K
- Revised 40K FAQs
- Revised Vehicles & Assault
- 40K Escalation Leagues
- Facts about FAQs
- Struggle for Vor'Anoth
- Tactics for 40K Flyers
- Return to Space Hulk

Painting and Modeling
- Display Trays
- Freehand Decals
- Basic Modeling
- Creature Feature
- Weapons of War

Terrain
- New 40K Tables
- Comm Bunker
- Top 10 Scenery Tips
- Basic Texturing
- $50 Scenery
- Defensive Terrain


ARMIES OF THE 40K UNIVERSE

Chaos Space Marines
Daemonhunters
Dark Eldar
Eldar
Imperial Guard
Necrons
Orks
Space Marines
Tau
Tyranids
Witch Hunters

40K SUPPLEMENTS

Chapter Approved
Cityfight
Eye of Terror

SCENERY SPECIFICATIONS
Tau Escape Pod (or Tau Bunker): Warhammer 40,000 or Epic 40,000
Difficulty level: Easy
Materials Used: Kitchen Spray Hose Guide, Tau Drone and stem from flying stand (from bitz box), Masonite, stones, Woodland Scenics Field Grass, Woodland Scenics Static Grass Flock, and sand.

TAU ESCAPE POD

There are a ton of plastic and metal plumbing components at your local hardware store that are begging to be transformed into something a little less mundane than a toilet stopper! The kitchen spray hose guide was commonplace kitchen sink hardware that had the smooth lines of an alien device. With images from the scenario in Codex: Tau in mind, we got to work.

To begin working on the escape pod, we cut out another circular base from the Masonite. Again, we sanded the edges down to a 45º angle, and it was ready to go.

The package of kitchen plumbing parts actually contained three separate components: a doughnut-shaped piece, a circular terraced piece with four fins, and a pipe with threaded grooves. We threw the threaded pipe into the bitz box to be used on future project. The remaining piece, when assembled, immediately suggested the clean lines of a Tau object. We glued the two parts together with superglue and then glued this directly to the base. There was a huge hole in the top of the escape pod, and we covered it by gluing a Tau Drone attached to a truncated flying stem in place. However, before the Drone was glued in, we sprayed Chaos Black Spray Primer down into the gap. If this step had been skipped, it would have been nearly impossible to get any paint inside. Not a good thing at all!


After the escape pod part was finished, it was smooth sailing. We attached rocks to the base with superglue and glued sand down with wood glue.

Once the glue was dry, painting could begin. We primed the entire surface black. Then, we painted the sand with various browns, followed by the rust red boulders for contrast. We painted the Tau escape pod as shown in Codex: Tau, making it easily recognizable to other players as Tau. However, feel free to paint it any color you like, though you will probably want to match it to the color scheme of your army if you have your own Tau force.

Once the pod was finished, we glued Static Grass and Field Grass to the base. This type of scenery is extremely simple to make. Finding objects like these at your hardware store saves you time and energy.


Ruined Columns
Dilapidated Shed
Tau Escape Pod
Ruined Wall

INTRODUCTION INDEXSUMMARY

Home | About Games Workshop | Job Announcements | Contact Us | Introduction Tour
GW Worldwide | Help | Shopping and Online Store | Investor Relations | Site Map
Privacy Policy | Terms of Use
Copyright Games Workshop Ltd 2000-2005