# of Items: 0
Total: $.00
- CHECKOUT -

Getting Started with Warhammer 40,000
Warhammer 40,000 Miniatures Catalog

Gaming
- The Amber Prison of Tikgrix
- Choose Your Own 40K
- Revised 40K FAQs
- Revised Vehicles & Assault
- 40K Escalation Leagues
- Facts about FAQs
- Struggle for Vor'Anoth
- Tactics for 40K Flyers
- Return to Space Hulk

Painting and Modeling
- Display Trays
- Freehand Decals
- Basic Modeling
- Creature Feature
- Weapons of War

Terrain
- New 40K Tables
- Comm Bunker
- Top 10 Scenery Tips
- Basic Texturing
- $50 Scenery
- Defensive Terrain


ARMIES OF THE 40K UNIVERSE

Chaos Space Marines
Daemonhunters
Dark Eldar
Eldar
Imperial Guard
Necrons
Orks
Space Marines
Tau
Tyranids
Witch Hunters

40K SUPPLEMENTS

Chapter Approved
Cityfight
Eye of Terror

SCENERY SPECIFICATIONS
Crumbling Wall: Warhammer 40,000
Difficulty level: Medium - Difficult
Materials Used: Street Elbow, Plastic Tailpiece Nuts, Beveled Washers, 1/2" Foamcore, 3/16" foamcore, paperclips, Kitchen Spray Hose Guide, thin plasticard, Masonite, Woodland Scenics Field Grass, Woodland Scenics Coarse Turf, Woodland Scenics Static Grass Flock, and sand.

CRUMBLING WALL

Half-destroyed buildings for use in games of Warhammer 40,000 are extremely easy to make and essential in depicting the war-torn 41st millennium. They’re even easier when you buy some plumbing hardware! The ruined wall shown below was built around the plastic parts we obtained on our trip to the local Home Depot. Read on to see how we built it.

This piece of scenery started with a circular piece of Masonite just large enough to hold the wall. That way, if you made other walls, you could butt them all together to form a continuous line. We sanded down the edges to a 45º angle. Then, we considered how the wall would work in conjunction with the metal piping that would be part of it.

We worked on the “pipes” first. We experimented with different combinations of parts and figured out how much space would be taken up by the plumbing hardware and the foamcore when they were assembled. By playing around with elements before assembling anything, we made sure that everything fit properly on the Masonite base. Before we went further, we glued Plasticard and thin foamcore to the plumbing since it was easier now than when assembled. Now to cut out the wall.

Foamcore is THE wall-building material. It’s lightweight. It’s relatively easy to cut (make sure you have a fresh hobby knife blade, because a dull one may shred the foam core). Foamcore has two sides that are covered in paper, so you only have to worry about covering the edges before spraying it with primer, which melts foam. Insulation foam is good for scenery work too, as you can carve in details and actually sculpt the surface. However, 1/2" thick foamcore is perfect for making walls.


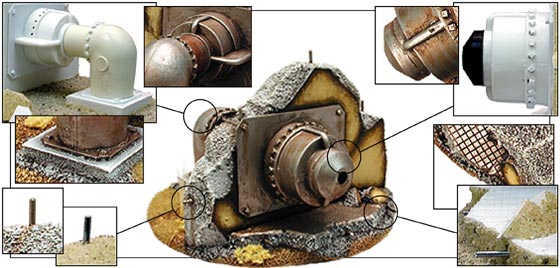
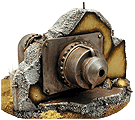
To create the wall, we cut a piece of 1/2" thick foamcore from the larger sheet and measured where it would be placed on the base. We used a hobby knife to create the irregularly shaped edge, and the leftovers became large chunks of rubble. We cut the floor on one side of the wall from 3/16" foamcore and placed it against the wall. Then, we cut a piece of plasticard (buy plasticard with a smooth side and a textured side to save money) to the same size and shape as the floor and glued it into place (texture side up) with superglue. Finally, we glued all the assembled pieces (the wall, floor, hardware, and rubble) to the Masonite.

We made the rivets from the squared-off textured side of the plasticard. We cut individual squares from the Plasticard and glued them on with a small dab of superglue. Once everything was glued down, we applied wood glue to the Masonite and the ruined edge of the wall. Sand was sprinkled on top of the glue, and it was left to dry.

Once we sprayed the piece with black primer, we drybrushed the broken edges of the wall, floor, and rubble with grey paint, while we painted the metal parts in suitably rusted metallic colors. For the inside and outside walls of the ruined building, we used a bone color to make them stand out from the grey and metal tones. We painted the ground in the usual browns, but we also left patches of grey around the sections of tumbled wall to resemble pulverized stone.

To finish the piece, we added Static Grass, Coarse Turf, and Field Grass. Try experimenting with larger sections of wall or even ruined corner sections.


Ruined Columns
Dilapidated Shed
Tau Escape Pod
Ruined Wall

INTRODUCTION INDEXSUMMARY

Home | About Games Workshop | Job Announcements | Contact Us | Introduction Tour
GW Worldwide | Help | Shopping and Online Store | Investor Relations | Site Map
Privacy Policy | Terms of Use
Copyright Games Workshop Ltd 2000-2005