|
Ultramarines
Icon
|
SPACE MARINE ICON
With the simplest of the Space Marine Chaper icons,
the Ultramarines provide a good place to start if
you are looking for a little practice with Chapter
badges.
Preparation
Complete the highlighting and shading of the entire
model before you paint the icon. If you plan on
putting battle-damage on the model, finish all of
the following steps for the large script before
you start painting on the dust, muck, scorch-marks,
and scratches. Set the model aside to dry entirely
before you add the script.
|
|
| Step
1 |
Practice your icon on a piece
of paper first.
|
|
|
|
|
|
Click
on the images to see larger versions.
|
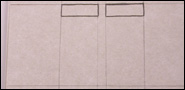
| Step
1a |
Draw two small rectangles at what
will be the top of the Ultramarines icon. |
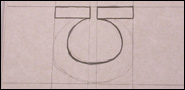
| Step
1b |
Connect the inner edges of both
rectangles with an oval. |
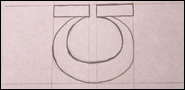
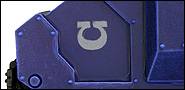
| Step
1c |
Make a larger oval
around the one from Step 1b. This oval
creates a large "U" shape that looks
slightly bloated at the bottom.
|
|
|
|
|
|
Click on
the images to see larger versions. |
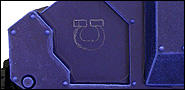
| Step 2 |
Next, take a sharpened
pencil with a soft lead (2B or lower will work
best, as harder leads may scratch the painted
surface) and lightly draw out the design that
you wish to paint. If you are working over a
dark color, use a white charcoal pencil (these
tools are available at most art supply or craft
stores).
Be sure to use an old brush or tissue to whisk
any pencil dust away from the model before you
start painting. Excess graphic dust will dull
and discolor your paint.
Now you are ready to fill in the lines with
color.
Note: With any freehand decal
painting, make sure you have the actual decal
on hand to make sure your rendering doesn't
go too far astray from the true form and shape.
Also, it’s wise to practice on a spare
piece of paper. |
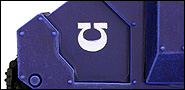
| Step 3 |
Paint over the pencil
lines with thinned-down Skull White mixed
with Fortress Grey (2:1). Test the consistency
of the paint before applying it to the model.
If the paint is too thin, it will lose its opacity.
If it’s too thick, it will make your design
lumpy and obscure the detail. You can test the
paint on an old model or a bit of primed sprue
if you like. When painting the design, make
sure to cover the pencil lines completely with
the paint.
This first layer provides a good layer on
which to paint the pure Skull White, as just
Skull White tends to have a hard time covering
over dark colors – especially when thinned
with water. |
| Step 4 |
Once the first coat
of paint dries, go back in with straight thinned-down
Skull White and paint over the previous layer.
If you’d like, try to leave a thin area
of the Skull White/Fortress Grey mix showing
through along one side of the icon. This step
will create more depth.
|
|
Finishing
up
If you need to, go back in with the color you used as
a basecoat on your vehicle and clean up any rough insignia
edges. Of course, the key is to paint the Squad Insignia
as neatly as possible, especially over a drybrushed
coat. If you clean up the Insignia, the basecoat will
stand out against the drybrushed surface. |
|
|