
|
The UK Studio recently ran a Top Ten Terrain Tips Contest
that has produced some very useful hobby material. While the
contest had Cityfight terrain in mind, many of the tips can
be applied to general Warhammer 40,000 scenery and terrain
for Warhammer.
A big thanks goes out to everyone who took the time to send
in their favorite Terrain Tip. After digging through hundreds
of terrain ideas, suggestions, short cuts, and techniques,
Dave Andrews and Mark Jones have compiled the following list
of winners.
|
|
|
Dave
Andrews
|
Mark
Jones
|
| 10th:
Stuart Kolakovic - "Car Boot" Sales (US Translation:
Flea Markets, Yard Sale) |
|
|
Mark and Dave: Good advice, you can find some real
gems here (and also some interesting people).
Stuart: Although I think this tip may not be strictly
what you are looking for, I highly recommend any terrain builder
to go check out car boot sales (flea markets)! Although this
tip may sound a bit weird, car boots are amazing places to
buy cheap, unwanted bits that can be easily slashed, crushed,
painted, twisted, and converted to make super-cool, yet cost-effective,
pieces of scenery.
For example, a simple household object such as a toaster
can be taken apart pretty easily with a screwdriver, and presto
– you have a million interesting bits to work with. Wires,
bulbs, bolts, casings, and parts that haven't really got a
name are excellent additions to existing piles of scenery
materials. Also, you may find a unique bit that sparks your
imagination.
Toys are also fair game. They are cheaper, and if you root
around, you can find really interesting stuff. I even found
a 4'x4' modeled desert that was meant for old cowboy figures
and a sewer that belonged to a bunch of ninja turtles. Then
you've got the train sets: loads of hills and trees can be
bought pre-made and easily tweaked to look even more realistic
(i.e., hanging corpses, flock, stones, and the like). Plus,
the train tracks themselves offer limitless possibilities:
ever considered modeling a coal mine straight out of an Indiana
Jones film or a slaver train weaving in and out of the cultural
detritus that is the underhive? Believe me, car boots are
worth a glance, just don't buy the questionable hot dogs from
the concession stand.
|
| 9th:
Timothy J.O. Gatehouse - How to Prevent Warped Bases
|
|
|
Mark and Dave: We agree 100%.
Timothy: Nothing makes you more angry than finishing
the main construction of your newest scenery idea only to
find that the glue has warped your base! I have two solutions
to this irritating situation, so don't throw your hard work
against a wall just yet!
First, the easiest method. DON'T use cardboard! Let me explain!
There is a cabinet material that is perfect for scenery, and
if you're polite enough, most cabinet makers will give you
scraps for free (cabinet makers usually consider anything
less than 2' or oddly shaped to be scrap, which is good news
for us). This stuff is called Masonite (or MDF, or Pressboard)
and usually comes 1/4" thick. It is a dark brown board
made out of fine sawdust glued together.
Get yourself a hand jigsaw or sabersaw (ask your parents
to help if you haven't used one before – power tools
can be tricky) and cut a block shape for city scenery or a
blob shape for rubble piles and small hills. The block shape
is great because it makes a cool curb in front of the building
(heck, you can even paint some sections of it to look like
no-parking zones!), and makes street areas look very realistic.
If you are working on rubble piles, bevel the edges for realism.
If you must absolutely use cardboard, then consider this
second solution (though it takes a little practice). Make
sure you use thick, corrugated, box-style cardboard –
not the thin package kind, and definitely not a cereal box!
Paint the underside of this cardboard base with watered-down
white glue and let it dry. When the cardboard dries out, it
will contract and warp slightly. Now, when you start applying
glue to the top of the cardboard, it will dry and warp to
balance the glue on the bottom, effectively straightening
it again! As I said, this solution requires a trial-and-error
approach, so when in doubt, try the Masonite. You won't regret
it!
|
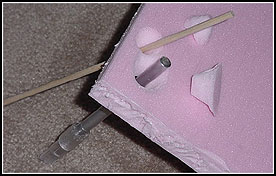
| 8th:
Greg Hojek - Holes in Walls |
|
|
Mark and Dave: This technique is simple and effective.
Greg: Here's my terrain tip for modeling walls with
shell or bullet holes. Using the handle of your X-Acto knife,
push through a Styrofoam wall. The handle will pop out the
other side, taking with it a much larger chunk of foam, roughly
in the shape of a cone. You can also use a wooden dowel, or
any other item with a flat, blunt, circular end. Using different
items will give you different sized holes. On the side you
pushed from, use the sharp end of your X-Acto to rough-up
the hole (star pattern blast marks, etc.). If the shot you
are modeling is near the ground or floor, spread coarse gravel
on the surface in a V-shaped pattern below the blast side.
|
| 7th:
Mike Adams - Pavement and Sidewalks |
|
|
Mark and Dave: Lots of terrain tips were entered,
but one of my favorites is this one about pavement.
Mike: The one thing I didn't like about the otherwise-brilliant
Cityfight terrain produced for the book is that they didn't
have pavements. So I went about my city terrain like so:
Create a baseboard for your entire city (consider Masonite,
but even cardboard can work), or break it up into a set of
sections for portability. Paint this baseboard like a road,
with appropriate texturing and colors (light sand texturing
with dark greys for asphalt, etc.). Then, when making your
buildings, extend the Masonite base 2" beyond the perimeter
of the structure to make a sidewalk. Round the corners of
this base like any street corner. Paint and texture the sidewalk
as appropriate (if you're really fancy, you can stick pieces
of thin card to the masonite to represent sidewalk slabs).
Now, place your buildings on your road-like baseboard with
the sidewalks lined up to delineate the streets. This setup
allows you to place the buildings in various combinations
without having to make new road scenery each time.
|
| 6th:
Brandon Koller - Gemstones and Jewels |
|
|
Mark and Dave: This one is not specifically for Cityfight,
but it is a great tip which I've used myself!
Brandon: To make large gemstones and jewels on Eldar
and Elf structures (such as warpgates, temples, and towers),
use the smooth (not faceted) faux gemstones with the metallic,
reflective backings from the jewelry section of the art supply
store. They are cheap and come in many sizes and shapes. Simply
glue them on. Also consider tracing the stone's edge onto
the structure before painting and carve the area within this
border down to about half a millimeter or 1/32" to create
a socket for the gem. Also, for Eldar vehicles and Wraithlords,
the sculpted "gems" already on the models can be
sanded/ground off and replaced with tiny faux gemstones for
a similar effect.
|
|
|
|
