|
Mark and Dave: This tip is a good one because by coloring
the plaster first, you avoid having to touch up the chips
later.
Dylan: For this method, you will need plaster, some
earth tones of acrylic paint, and some paper plates.
Mix a batch of watery plaster, about the consistency of thick
stew. Add some acrylic paint to this mix until you get a concrete-like
color, something like a warmish grey. Pour this mixture into
a large paper plate and let it set. Before it's fully dry,
bend the plate so that the plaster cracks and breaks apart.
Break any of the larger pieces into smaller ones if you wish
and set the pieces aside to dry. Once dry, you will have pre-colored
concrete rubble to put in and around all your damaged and
destroyed buildings.
|
|
Mark and Dave: This tip is a really nice and simple
way of texturing large areas quickly.
Jon: With regards to your top tips, I have found that
the plastic louvre ("toilet" in the US) air vent
covers can be used for quick and easy flooring or walkways.
They are cheap and readily available from home improvement
and hardware stores
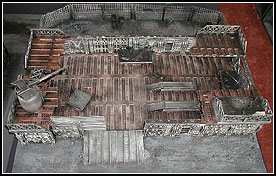 
Seen in the picture above are two 9" square covers for
the floor in the repair building. The upper tier is another
cover cut into smaller pieces. Once they are glued down, I
just spray them with black primer and drybrush with an appropriate
metallic.
|
|
Mark and Dave: This tip is a good one to work on while
you're waiting for stuff to dry, and it is also a simple project
for inexperienced modelers to try.
Donald: Inspired by your Defense articles but with
no craft shops open at 2 a.m. the other night, I was looking
at my ice cube-filled drink and came up with this idea for
another cheap and easy way to make "Dragon Teeth"
tank traps. Just use plaster filler and an ice cube tray!
Plaster is easy to carve, so realistic bullet holes and blown-off
corners are a snap. My first batch turned out great!
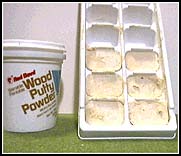  
I had to use some "Red Devil" powdered wood filler
for my putty, which I mixed to a milkshake-like consistency
with warm water and then poured into an old ice cube tray.
Then, I let it set overnight. As it dries, there will be a
little shrinkage, so they'll fall out of the tray really easily.
If the cubes have a glossy sheen to them, they're not completely
dry yet. Gently pop them out and set aside to finish drying.
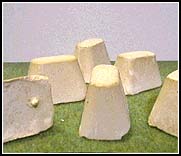
When the cubes are dry, sand the top (which will then be
the bottom) flat, and run a small wire brush either vertically
or horizontally over them to give them a coarse texture. Then
break out a sturdy jeweler's screwdriver, ice pick, or any
other stout tool with a fine point and start gouging away
by pressing the tip in and pushing it sideways so chips pop
out (again, be careful not to gouge your fingers). Vary the
size of the holes, and keep the majority of them on the front
facing the enemy. Taking out chunks on the edges look really
dramatic. I cut out a quarter of one and added paper clip
bits to look like mangled rebar. Finally, across the bottom,
scratch some deep grooves for your glue to adhere to. I used
a hot glue gun to attach them to my base.
 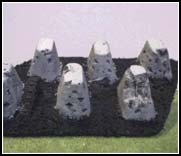 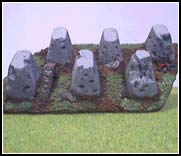
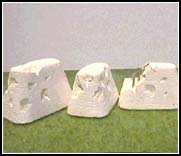
Six teeth per base, staggered in two rows with a gap large
enough to set a figure between works just fine. For the base,
I used 3/16" plywood cut into a parallelogram, so I could
stagger the teeth and still butt up the bases on the table.
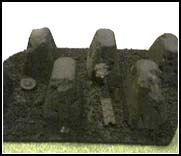
For battlefield rubble, I used old tracks and running wheels
off some WWII tanks that I had in my bitz box, as well as
some Warhammer 40,000 bitz. Base as normal with white glue
and fine gravel and sand.
After a basecoat of black spray paint, I went over all the
holes that I had missed with a brush. Three shades of grey
drybrushed on, then flock or drybrush to match your battlefield,
and you're done. Since I work with enamel paint, the project
took a few days, but the actual work took a few hours because
I was making four of them at a time.
|